Thursday, 26 July 2012

Savoury Lentils and Rice

This meal was inspired by a very popular traditional Egyptian dish which I shall hopefully post once I figure out how to make it properly :)...I wanted something filling, easy and nutritious for lunch and we all enjoyed this so much that I thought that I would share it. It is made up of four components (rice and lentil base, tomato sauce, garlic dressing and crispy fried onion). Don't be daunted by the seperate parts as it is really quite quick and easy to prepare. I served it with a fresh cabbage salad and it went perfectly. Put the tomatoes in first as the longer they roast for the better the taste!

Serves: 4
Preparation time: 15 minutes
Cooking time: 1 hour

For the roasted tomatos
10 medium fresh tomatoes cut into half wedges
1 1/2  tsp salt 
4tbs oil 
1 onion, sliced 


place tomatoes and onion in a tray. Sprinkle with salt and drizle with olive oil. Roast in oven at 250 degrees celcius, stiring occasionally until tomatoes are soft and juicy and edges are browned

For the rice and lentils
1 cup brown rice 
1 1/2 cup green lentils 
2 tsp salt 
4 1/2  cups water 

Rinse rice and lentils and then place in a saucepan with water and salt and cook until water is absorbed and lentils and rice are soft.

For the dressing
4 T lemon juice
4 T olive oil 
4 cloves garlic. crushed
1 t salt 
Mix all ingredients together.

For the crispy onion
2 large onions, sliced thick
oil for frying 
Fry onions on high until crisp and brown.


To Serve...Place rice and lentils on plate and top with tomato sauce, dressing and crispy fried onions.

O satisfy us early with thy mercy; that we may rejoice and be glad all our days.  (Psalms 90:14)


Posted By: Natahsa Mansour

Wednesday, 18 July 2012

Chokos, Chokos and more Delicious Chokos!


Well we moved to a new home and lo and behold there was a huge, heavy laden choko vine in the backyard. None of us had ever liked choko (or even tried it), but we were not going to waste good food so we had to come up with some delicious ways to eat it. So here are some ideas apart from the traditional use in apple pie and soups.
Firstly we should mention that chokos are very easy to grow, yield a good size crop and are very nutritious. They are a good source of vitamin C and are high in dietary fiber.


The young tender chokos are easiest to use as there is no need to peel them. They also seem to have more flavour.  They have a darker more vibrant green skin and you can pierce it with your finger nail. If the choko is a bit older and tougher, you will need to peel it. Be careful as the chokos are very slippery as you take off the peel. I did read that you can chop off both ends and soak them in warm water for a few minutes to take away the slipperiness but have not tried it as yet.
Here is how we came to love chokos and we hope that you do too.


GARLIC FRIED CHOKO


Some Brazilian friends had told us how they LOVE choko fried in garlic and onion so that was the first dish on the menu. However we made it just with garlic and it was scrumptious. We sceptically prepared this dish using only a couple of chokos at first,  in case we didn’t like it. Well, it was a favourite at the table and we regretted making so little. Danny and Marco loved it so much that promptly after breakfast they ran out to the backyard and harvested as many chokos as their little hands could reach. Presenting them to us in the kitchen with big grins they exclaimed “Look Mummy and  Aunty Tashy, we picked the chokos for you.” We both knew that they were hoping for another meal of “garlic fried choko” and sure enough they requested it again the next day!

Ingredients

2 Tbs olive oil
2 large or 4 small chokos (about 500g)
4-8 cloves fresh garlic
1 tsp Celtic Sea salt
Chop the chokos so that you have pieces about 4mm thick (I usually cut the choko in half, then into strips and then cut into three but you can do it as you please).
Fry choko in the oil and salt for a few minutes
Add crushed garlic and continue to stir occasionally until tender.


CHOKO CHIPS


A gentleman at the markets told us that choko chips is the favourite at his barbeques so we decided to try those too. This quickly became Naders favourite, and well to be honest, we were all pleasantly surprised at how good they really were! We have made them several times since.


BATTERED CHOKO FRITTERS - GLUTEN FREE


Finally at a luncheon we were introduced to battered chokos. I have no idea what was in them but decided to make a gluten free version.

Ingredients

1 large choko, sliced to about 4mm thick
1 cup besan (chickpea) flour
2 ½ tsp herb salt (such as herbamere)
1 cup water
½-1 cup rice crumbs
Olive oil and water for frying


Whisk together the besan flour, water, 1 Tbs olive oil and 2 tsp salt to form a batter
 

Use the method below for frying using minimal oil
1. Heat a large non stick fry pan to a medium heat. (the fry pan must have a lid)
2. Dip the slices of choko in the batter and then rice crumbs and place in slightly oiled pan. 
 
3. Cover with the lid and leave for a couple of minutes, until the underside is browned. 
4. Lift lid and pour 1/8-1/4 of a cup of water in spaces between choko and cover immediately. 
5. Leave until all water absorbed, then drizzle a very small amount of oil on the top of the choko slices and flip them. 
6. Repeat  steps 5 to 7 for the other side of the choko slices. 
7. Finally turn the slices over to crisp up the top side as it may be slightly softened by the steam.
The choko inside the batter should be tender and cooked and the batter surrounding it browned.

Of course, you could simply fry them using more oil but we use the minimal method for the healthier option.
But my God shall supply all your need according to his riches in glory by Christ Jesus.  (Philippians 4:19)

Posted By: Melissa and Natasha

Wednesday, 11 July 2012

Pumpkin Curry


 Curries are all about flavor, usually made with a combination of different spices. This dish is packed with flavor and nutritional goodness. There are many different kinds of pumpkin.  I like to use butternut or jap pumpkin for this dish. The flesh remains dry and does not release too much water when cooking which is what you want. Choose pumpkin that has dark orange flesh this ensures a rich sweet flavor. Pumpkin is full of fiber and a wonderful source of vitamins A, C, K, E Also rich in minerals such as iron, potassium and magnesium.

Serves 4-6 people makes a colorful accompaniment to a main dish

Ingredients

625g pumpkin, peeled and cut into bite size pieces
5 medium size garlic cloves, peeled and crushed (If you have a mortar and pestle use to prepare garlic and ginger add a little salt then use pestle)
1 1/2 teaspoons fresh grated ginger
1 large onion, finely chopped
8 - 10 curry leaves (optional)
1 teaspoon mustard seeds
1 teaspoon cumin seeds
1/4 to 1/2 teaspoon turmeric
1 teaspoon of salt or to taste
1/4 to 1/2 cup water
2-4 tablespoon light tasting oil, (vegetable, or sunflower)


Method
Heat the oil in a heavy based pan on medium heat. Add mustard seeds, cover and allow to pop briefly. 
Add cumin seed and curry leaves allow to saute 1 minute then add onion and cook 2 minutes.
_ Add crushed garlic and ginger cook further 2 minutes
Add turmeric stir briefly then add pumpkin pieces and salt, stir until well combined. Cook for a few minutes on med heat then add water, place lid on pan and turn down to low. Cook until done check often it dose not take long.

Note the amount of water may not seem enough but once the pumpkin starts to cook it will release water. The idea is to keep it as dry as possible unless you want a soupy curry. 

ENJOY

Posted by Yiannoulla Burness

Galatians 5:22
But the fruit of the Spirit is love, joy, peace, longsuffering, gentleness, goodness, faith,


Saturday, 30 June 2012

RAW Buckwheat Cripsy Cereal

It is hard to take a picture of this dish BUT it is YUMMY!! It is our families favourite cereal and it never lasts long. The great thing is that it is ultra quick to make and RAW!! 

Dehydrator is needed for this recipe :o)

Ingredients:
2c                    buckwheat grouts, soaked for at least 1 hour
¾ c                  maple syrup, honey, agave
1 ½ t                vanilla extract
2t                     celtic salt

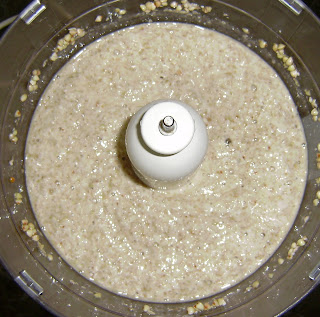
  • Place buckwheat in colander and rinse. Place in bowl of food processor and add remaining ingredients. Pulse until very well combined but not pureed. 

  • Divide between two telex-lined trays and spread to 1/8 inch thick. Dehydrate at 115(f) for 8 to 12 hours, or until top is dry and teflex sheet peels away. Flip over and dehydrate for a few hours until completely dry and crunchy. Break into pieces and store in airtight container. Can last a few weeks in an airtight container.
  • Serve with fresh raw nut milk and fruit of your choice. Enjoy!

"God is good!!"

Posted by Melissa Awde


Wednesday, 20 June 2012

Wholemeal Plain Or Fruit And Nut Bread


Have fun making your own bread. There is nothing so good as home baked bread. The taste is amazing, you will want to make it over and over. This is a one loaf, one rising recipe. Make it plain or add your favorite dried fruit, nuts and or seeds. To make it even more healthy grind your own flour using organic wheat.

Preheat oven to 180 degrees celcius

Ingredients you will need


1 cup unbleached plain flour
1 cup bakers wholemeal flour (or stone ground)
1/4 cup gluten flour (optional) gives more texture to the bread
3 tablespoon grape seed or light tasting oil
2 teaspoon instant yeast
1 teaspoon sweetening ( agave, honey, rapadura sugar)
1 teaspoon salt
Luke warm water
Sesame and or sunflower seeds ( for coating)


Fruit Loaf


Add 1mixed cup of your favorite dried fruits, nuts and or seeds to above ingredients
I chose organic raisins, currants, goji berries and walnuts

 Method

Lightly grease a 9 x 20cm loaf tin

Making dough using a stand mixer with dough hook

(1)  Place all ingredients except the water into a mixing bowl. Attach dough hook. Slowly add the water and knead until dough clings to dough hook and sides of mixing bowl become clean. This is usually done on a low speed or according to manufacturers instructions for your machine. Continue to knead dough for about 4 minutes. 

Making dough by hand

 (1)  Place all ingredients in a large mixing bowl except the water. Make a well in the center,  slowly add a little water at a time until a soft dough is formed. Knead for about 10 minutes.

(2) When dough is ready shape into a loaf.
(3)  Lightly brush loaf with water and sprinkle with sesame and or sunflower seeds, pat down with hands or gently roll dough.
(4)  Place dough in prepared tin. Take a sheet of glad wrap, spray with oil on one side. Place oiled side facing down over dough. This prevents dough sticking to plastic when you remove it.
(5)  Cover with a wet warm tea towel  and leave to rise in a warm place until doubled in size. (for a quick rising method see pizza recipe on this blog)
(6)  When dough is risen, place in preheated oven on the middle rack in center of oven. Bake for 35 minutes. Remove bread from oven and let it rest a few minutes before removing from tin. 
(7)  Turn out onto a wire cake rack and allow to cool. Make sure bread is completely cool before placing in a storage container.

This bread freezes really well. Slice loaf before freezing


John 6:33 For the bread of God is he which cometh down from heaven, and giveth life unto the world.


Posted by Yiannoulla Burness


Wednesday, 13 June 2012

Macadamia Cookies


 Some friends bought these cookies to our home to share with us and they were so scrumptious that I wanted to share them with you all too. They are very simple and quick to make and a lovely treat for the whole family. I was told that you can use other nut butters as well but haven't tried as yet as the macadamia ones are so good!

Ingredients
1 cup whole wheat/spelt flour
1/2 C macadamia nut butter (you can buy this at some markets and health food stores) however I make my own in the champion juicer or food processor.
1/4 Cup honey
1/4 tsp celtic sea salt
2 Tbs macadamia nut oil
1/2 tsp vanilla paste


Mix all ingredients except flour. 
Then add flour and mix well.


Form into balls and place on baking tray lined with baking paper. 
Press down with back of a fork.


Bake at 175 degrees celcius for 8 minutes or until golden. be careful to watch them as they will burn fast. I like to do mine a little longer as we like them crunchy but they are lovely chewy too. 


 They are also lovely with a drizzle of melted soy carob or with the base dipped in it. Experiment and Enjoy!

Let my mouth be filled with thy praise and with thy honour all the day.  Psalm 71:8

Posted By: Natasha Mansour


Related Posts Plugin for WordPress, Blogger...